Machine Learning Build system: Using Qwak
In the previous blog post, we demonstrated how to implement an ML build system. We retrieved the training data, trained a classification model, and created a REST service in a Docker image. In the end, we started the Docker container, ran the tests, and uploaded the image to ECR.
The code we wrote was quite verbose because we needed to write the Dockerfile, install all required libraries, and copy the serialized model. Also, the only way to reuse the code is by copying and pasting parts of it. To deploy a new model, we’ll need to repeat the entire process. Imagine how difficult it would become if we had a dozen models running in production.
Thankfully, we can simplify model training and deployment by using Qwak. Qwak handles model training, dockerization, testing, and deployment---all from the Qwak platform.
In this example, we'll train a Titanic classifier using CatBoost.
Project setup
To start, we have to create a Qwak project and a model within the project using the Qwak command-line tool:
The command will return the project UUID, which we’ll need later to create the model using the command-line interface (CLI).
Alternatively, we could create the project using the web UI. In the Projects view, click the “Create New Project” button and provide the project name and the description:

From here, we create a new model. First, let’s do it using the CLI. Note that the command creates only a model placeholder in the Qwak platform.
We can also use the web interface to create a model. Let’s open the project created in the previous step and click the “Create New Model” button in the project view:

Now we need to prepare the project directory. For that, we will use the Qwak CLI:
The command-line tool will ask us about the model directory name and the model class name. When we specify the required information, it will create two directories: main and tests.
In the main directory, we need three files: __init__.py, conda.yml, and model.py. We will use them to configure the runtime environment and build the model.
In the conda.yml file, we put the dependencies required during training, runtime, and testing.
Training the model
In the model.py file, we extend the QwakModelInterface class. In the class, we put the training code and the inference code. Let's start with the imports:
In the constructor, we will prepare the CatBoostClassifier classifier. We need to put the model in an object field because we need access to the same model.
Let’s say we would like to log the training parameters. Qwak gives us a specialized method for logging training parameters, which we can use in the constructor:
Now we can start training the model. We'll need to extend the build method. In the method body, we'll put the same code as in the previous article:
At the end of the build method, we can also log the accuracy of the trained model using the Qwak API:
That's enough to train a model in the Qwak platform, but before we initiate it, we must also prepare the inference code in the TitanicSurvivalPrediction class.
Inference code
First, we specify the schema used by the REST API. The schema is optional, but if we define it, Qwak will show us example inference code in the Qwak UI:
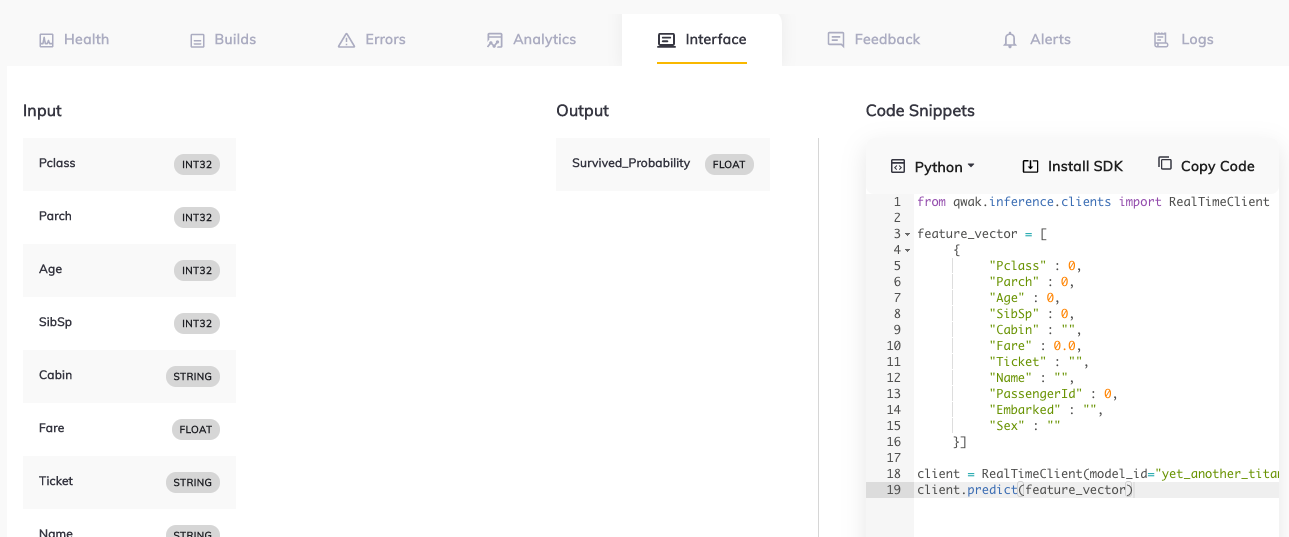
We'll define the input schema and the schema of the returned JSON object. Then, we'll pass the entire row from the Titanic dataset. In our API, we also give the PassengerId, which is useless for the classification. However, we'll do it anyway to demonstrate the data preprocessing in a Qwak model.
In the end, we need to implement the inference method. This method receives a pandas DataFrame with the input data, executes the data preprocessing, obtains a prediction from the model, and returns the response in the same format as the one defined in the schema:
Note the `@qwak.analytics()` decorator. The decorator instructs the Qwak platform to track the requests and metadata related to runtime performance. Later, we can check the request elapsed time and memory usage, or retrieve the request logs.
The last thing we must do is create the model object in the __init__.py file:
Building the model
We can use the Qwak platform to train the model:
The Qwak command-line tool will upload the code to the server, install the dependencies, and train the model. We'll see the training result in the Qwak web UI. In the UI, we can also deploy a trained model in the Qwak platform and use the Python API to infer the classification.
However, before we retrieve the predictions, we will add the testing code to the project.
Testing the model
As a part of the model build, we can run test cases to verify whether the model works correctly. In the `tests/it` directory, we can create a test class test_titanic.py that uses the Qwak mock client to verify the model predictions:
Obtaining predictions from a deployed model
After building the model and deploying it, we can use the Qwak inference client to obtain a prediction from the model running in the Qwak platform:
Qwak
Using Qwak, we minimized the training, testing, and serialization mode. Contrary to what we did in the previous article, we write only the model-specific code and don't need any boilerplate.
Say goodbye to complex AI & ML
Chat with us to see the platform live and discover how we can help simplify your journey deploying AI in production.
